With the Adxstudio Portals v7 product I can’t count the number of times that Adoxio has had to extend the search functionality with enhancements for customer requirements. With the latest release of Dynamics 365 portals, Microsoft has really made extending and customizing the out of box search extremely easily and powerful. The search is now built on top an asynchronous call to ensure page load performance is fast and the results all rendered with Handlebars templates. They have really gone a step further by taking those Handlebars templates and making them accessible through the Web Templates functionality; results display, paging, sorting, and the new facets are all available as Web Templates that you can customize and configure.
You can read more about the new base search functionality from a blog post on the Dynamics Team MSDN Blog, Search enhancements in Portal capabilities for Microsoft Dynamics 365.
If you’re not familiar with Handlebars you might be wondering what it is. Handlebars is a JavaScript framework, in which you can build semantic templates, with no frustration, or so they say 😉 – read more about why semantic templates help developers from Martin Brennan, Semantic templates with Mustache.js and Handlebars.js. Think of a template as being a view of how you want each item in the results rendered; put the title in an H3, description text in a P, add this class, etc. Why this is important is that the framework has a lot of power that beyond just formatting that allows you to easily modify the templates so you can create your own views, but also extend the functionality by adding helper methods with custom logic.
With the functionality of Handlebars helpers you can build functions to process the data submitted to a template. So if you wanted to do some sort of conditional processing or format on each item rendered, building your own helper can help you meet a certain requirement. Recently on the Dynamics Community Forum a member was looking to extend each result item with additional data from the full entity itself. So if the result was a Knowledge Article they might want to also show the subject or other categorization metadata in the search result. The default data context returned by the search to keep performance high has a limited set of attributes that really only include what you see rendered in a result. With a Handlebars helper and the power of Liquid we actually have the capability to go get the detail data for that particular entity record result.
For this example the Handlebars helper is going to make a synchronous AJAX request passing the entity ID of the result item, which will be then processed by a Web Template using Liquid to go get additional data that will then be included in the result item. First we need to setup our Web Template that will take the entity ID and go get the additional data and format it for us.
{% assign eid = request.params['entityid'] %}
{% assign wpage = entities.adx_webpage[eid] %}

<p><strong>Name:</strong> {{wpage.adx_name}}</p>
We are going to assume for this that the result is always a web page but you could easily add an additional parameter for the entity logical name and then have conditional branching to handle different entities. Basically the template just takes the query string parameter entityid, uses the liquid entities object to query the web page entity for the desired ID then displays the page name back. You could access any of the attributes in the web page or whatever entity you had queried.
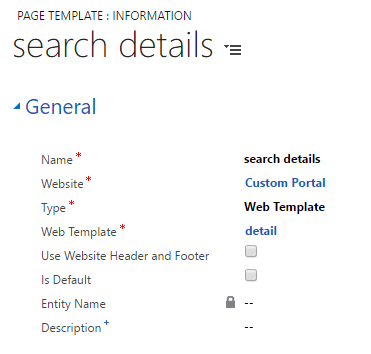
Once the Web Template is created we now need to make it accessible to the AJAX call we are going to later configure. To do so we need to add a Page Template that uses this Web Template. Create a new Page Template from Portals > Page Templates. Ensure to set the Type to “Web Template”, select the Web Template as the template you just created, and deselect the “Use Website Header and Footer”. All we want this page to return is the HTML that is to be included in the result.
Now to make your page template accessible via a URL you will need to create a Web Page that surfaces the Web Template your Page Template refers to.

You can test your template is accessible by just directly calling its URL in your browser with an ID included, https://testingportal0001.microsoftcrmportals.com/search-details/?entityid=94216ad7-7864-e611-80d7-00155db4fa48. All you should get back is the simple HTML in the template since we removed the Website Header and Footer.
Now we need to register our Handlebars helper that is going to request this template. To do so we need to add some custom JavaScript to the search results page. This can be easily done with the front-side editor or you can access the web page from the CRM (Portals > Web Pages > Search). If using the front-side editor, login with your Administrative account, run a search query and then select the Edit from the CMS control, select the Options tab, and then paste in the following to the custom JavaScript section.
Handlebars.registerHelper("search_details", function (obj) {
    return $.ajax({
      url: "/search-details/?entityid=" + obj.fn(this),
      type: "GET",
      async: false
    }).responseText;
});
Basically it makes a synchronous AJAX request (it needs to be synchronous as the it is already an asynchronous request for the results) to the URL we created with our Web Page passing the entityID. It will return the HTML as the responseText which is then returned as the result of the Handlebars helper. You would be able to put whatever logic you want within this function, whatever JavaScript allows you to, which is A LOT.
Now that we have our helper function, and our template, its time to modify the search results Web Template that is provided out of the box to include a call to our new helper. Navigate in CRM to Portals > Web Templates, open the “Faceted Search – Results Template” and you want to add the following within the {{#each items}} where you want your extra details to show up: {{#search_details}}{{entityID}}{{/search_details}}. This will call our helper method passing the entity ID of the result item.
{{#each items}}
 <li>
  <h3><a title="{{title}}" href="{{url}}">{{title}}</a></h3>
  <p class="fragment">{{{fragment}}}</p>
  {{#search_details}}{{entityID}}{{/search_details}}
  <div>
   {{#each tags}}
    <span class="{{cssClass}}">{{./label}}</span>
   {{/each}}
  </div>
 </li>
{{/each}}
With Dynamics 365 portals you also need to be very aware of entity permissions. Our liquid query will return nothing if we do not provide permission to that entity. You will need to decide exactly how to configure the entity permission, for this example I am just adding an entity permission for Web Page with a Global scope and the Web Roles Anonymous and Authenticated User. It is important to be careful and aware of what you configure with entity permissions as they are what gate and protect the data in your CRM.
Now that it is all configured, head back to the portal and refresh your search results or perform a search query. Your results should now include your extra template on each and every result.

My template for this example was simple, but with the power of liquid querying you could really include anything here. This example also focused on adding additional details but Handlebar helpers can be used for a lot more.

Hey Colin,
I was wondering if you had any suggestions for adding additional facets to filter the results…
The helper you described before allows additional data to be displayed for each item, but facetViews is an already prepared list that is generated…. somewhere?
LikeLike
Hi Andrew, the facets are not able to be customized currently to the extent you need as far as I am aware. The search customizations are really only at the view level presently.
LikeLike
I was able to implement this and get a hard-coded entity to be returned, etc. The issue is that I am not able to use entityID, nor id to actually pass in the guid correctly. The {{#each items}} allows me to easily access the attributes like title, url, etc. But it does not seem to have an attribute for the guid.
When I look at the following link it says ‘id’ should be one of the attributes:
https://community.adxstudio.com/products/adxstudio-portals/documentation/configuration-guide/liquid-templates/objects/searchindex/
Specifically, this statement is not returning anything, but if I hard code a GUID instead, it works.
{{#search_details}}{{entityID}}{{/search_details}}
LikeLike
Collin, it is now working, not sure what was causing the issue before, but I no longer have any issue. Thanks! Your blog and liquid templates are so helpful!
LikeLike
Another question, if we have Faceted Search off in site settings, Microsoft is displaying a different layout (which is desired), but it appears that this layout is not driven by any web template and thus we are unable to add additional fields in the same way you can to the faceted search layout. Any insights in how to modify this page, or create our own page? We want a simple layout, but need to re-direct the links to our own article details page, and also include the first part of the content, instead of the fragment that is currently shown.
LikeLike
Is there a way to change the default {{title}} context from the “adx-name” field?
For the Web Page entity, it would make more sense to use the “adx-title” field which is localised as the {{title}}, however the search results is using the “adx-name” field instead. I cannot find where this would be changed? Any help would be appreciated.
LikeLike
It would definitely make more sense for them to do that and I would suggest opening a support case so they are better aware. I am not aware of an easy way to customize this yourself currently.
LikeLike
Thank you for this blog post, it saved me a whole bunch of hours trying to figure this all out.
LikeLike